

User Manual
awaBerry | User Profile & Settings
The User Profile & Settings screen provides account information, licence management, daily usage statistics, AI provider configuration, S3 storage setup, GDPR data access, and danger-zone actions.
User Profile & Settings
Summary
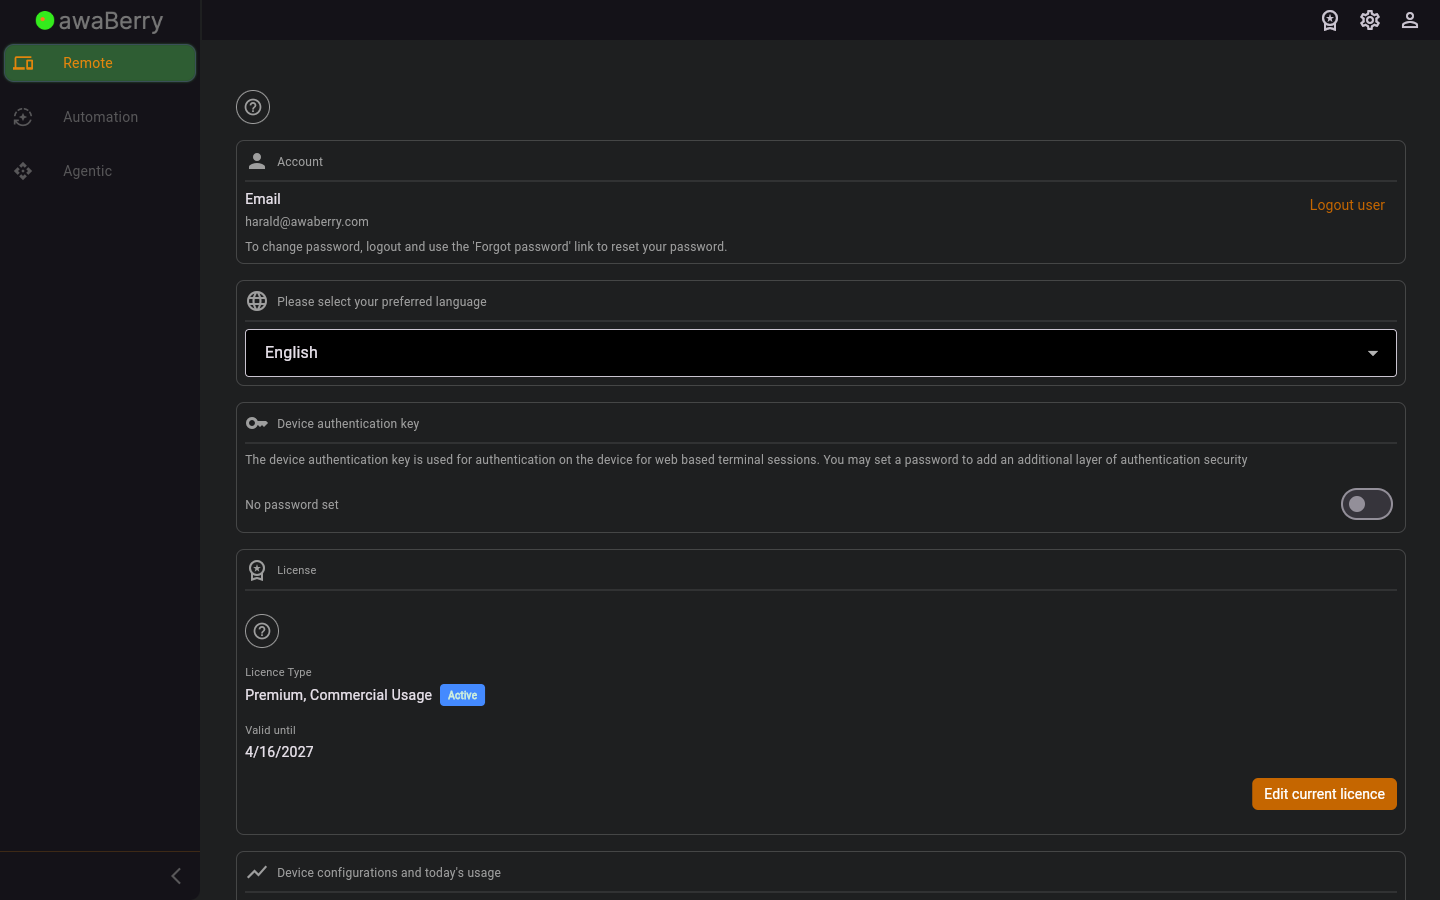
This is the central settings screen for the logged-in user. It consolidates account information, two-factor authentication management, licence and subscription details, today's usage statistics, optional AI intelligence provider configuration (Google Gemini or Anthropic Claude), custom S3 storage setup, GDPR data viewing, and danger-zone operations such as uninstalling awaberry or deleting the account. The screen is accessed via the sidebar user menu and adapts its visible sections depending on whether a loadable licence is available.
Screen on arrival
Page Functionalities
- Account section: Displays the user's registered email address and a note about password changes. Contains a Logout user button (TextButton) that calls the logout flow via
/logout?logout=force. - Language dropdown (DropdownButtonFormField): Allows the user to select their preferred application language from all supported locales. The selection is applied immediately.
- Device Authentication Key section (Switch): Shows whether the private device key is password-protected. Toggling the switch opens form fields to set or remove the key password. Includes a Set Password / Remove Password button and an optional "Remember password for auto-encryption" checkbox.
- Licence section (ManageCurrentLicence widget): Displays licence name, category (commercial / private / connect), subscription status badge (Trial / Active / Expired), and validity date. Shows an Edit Current Licence TextButton (opens the licence edit flow in a modal route) or an informational store note when the subscription was activated via Apple / Google stores.
- Today's Usage section (DisplayDailyUsageStatistics widget): Shows bar charts and numbers for daily usage of: remote session time, intelligent terminal commands, file browser transfers, VNC time, and web-to-local sessions, compared against licence limits.
- Optional Intelligence Provider section: Contains two rows — one for Google Gemini and one for Anthropic Claude — each with a Switch and a Setup button. When both keys are configured a dropdown lets the user choose the preferred provider (Gemini / Claude). Requires 2FA to be enabled for key storage.
- S3 Storage Configuration section (Switch + TextButton "Setup S3 Storage"): Shows whether own S3 storage is enabled. The Setup button opens the S3 storage configuration dialog. Requires 2FA to be enabled for credential storage.
- View Stored Data section (TextButton "Open report"): Navigates to
/user_reportstoreddatato display GDPR data. - Support section: Shows links to the user manual website, the contact form, the bug report form, and the abuse report form (all open in external browser).
- Danger Zone — Uninstall section (TextButton "View Uninstall Instructions"): Navigates to
/user_uninstall. - Danger Zone — Delete Account section (TextButton "Delete My Account and Data"): Navigates to
/user_deleteaccount.
Scenario: Setting a device authentication key password
- Open the User screen (
/user_main). - Locate the Device Authentication Key section.
- Toggle the Switch to the ON position.
- Enter the new password in the Enter Password field and repeat it in the Re-enter Password field.
- Read the warning about remembering the password.
- Click Set Password. The app encrypts and stores the key; a green confirmation message is shown.
- Optionally enable Remember password for auto-encryption checkbox to avoid re-entering the password each session.
Scenario: Configuring a Google Gemini API key
- Open the User screen. Ensure 2FA is enabled (required for key storage).
- Locate the Optional Intelligence Provider section.
- Click Setup next to the Google Gemini row or toggle the Switch.
- The Google Studio API key setup dialog opens.
- Enable the toggle, paste your API key, and click Test and store key.
- On success the key is validated, encrypted, and saved; a snackbar confirms storage.
- The User screen reopens and shows the Gemini provider as active.
Scenario: Changing the application language
- Open the User screen.
- In the language dropdown select the desired language.
- The application language changes immediately without requiring a page reload.
